Air Hockey Strategy – How to Win for Beginners
Want to know the quickest way to play air hockey and win? We’ve got you covered.
You see it’s one thing to knock the puck back and forth, but when it comes to playing against someone who’s out to win – the game gets fast real quick!
Now it’s easy to assume that some people are just naturally better players. But when it comes down to it, even the best air hockey players in the world had to start at the beginning.
We’ll take you through the techniques that professional players use. Using their techniques, you’ll quickly shoot way beyond the newbie stage and on your way to winning like a pro.
How to Hold the Mallet
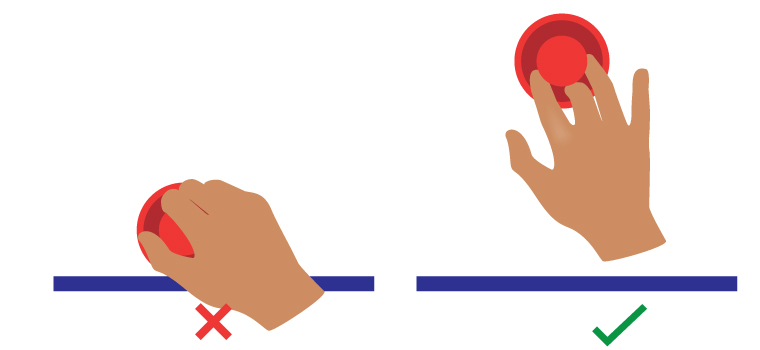
Most beginners grip the mallet (or paddle) with their hand over the top of the handle. But this will actually hold you back if you want to play like a professional. It will probably feel a little awkward at first, but you’ll advance so much quicker if you start with the correct grip. There are actually 3 basic types of grip that professionals use, but the most commonly used is the three-finger grip:
The 3 Finger Grip
- Bend the middle finger of your dominant hand and place it in the groove behind the paddle’s handle.
- Place your index and fourth finger on either side.
- Your thumb and little finger should not touch the paddle for this grip.
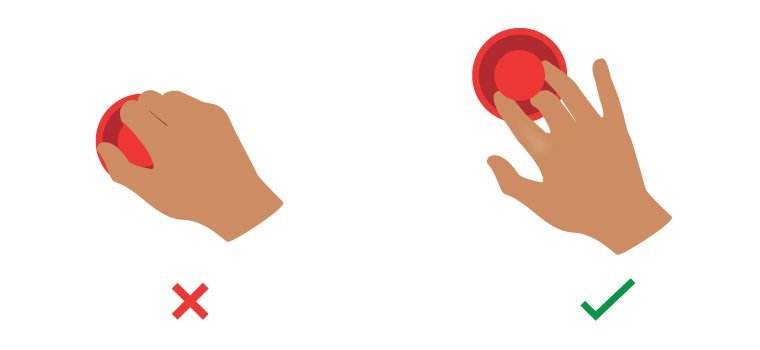
Why the Correct Grip is Important
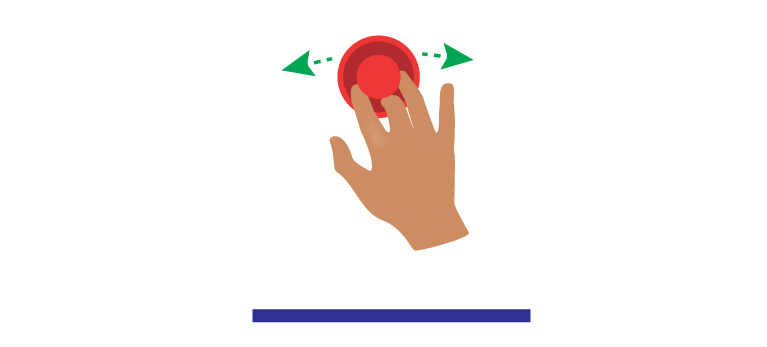
The big advantage of using the correct grip is that it allows you much greater flexibility of movement as well as more stability and control over the mallet. Practice using the 3 finger grip, and you’ll be able to move the paddle at lightning speed to deflect a puck from any angle. Not only that, but you’ll also be able to get more power behind your shots.
Tips:
- Make sure your fingers don’t grip too tightly in the mallet’s groove. Shake your hand a little from side to side – the mallet should be flexible so that you can control it and move it around with ease.
- A looser grip allows you to absorb the puck when it hits you. That means you can catch it to establish control (See puck control below).
- You may want to use a glove to protect your fingers. Some professionals tape their fingers for protection and for a better grip. The pucks used for official matches are heavier than most that are used for recreational purposes, so whether or not you choose to use a glove or tape on your fingers will be down to your own preference, as well as the mallet and puck you are using for your air hockey table.
Other Grips
Some players use a 4 finger grip when they want more stability and increased power behind a shot. This grip is not as flexible as the 3 finger grip but having four fingers in the mallet’s groove allows you to pinch the mallet with your thumb. If you find the 3 finger grip doesn’t work for you or you keep accidentally throwing the mallet, you could try the 4 finger grip.
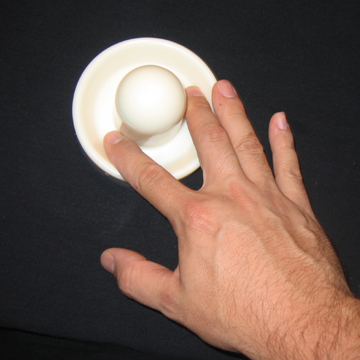
Another type of grip is where the nub is between your first and second finger like you can see in the photo left. It has some useful advantages in that it can be powerful but it’s less flexible and so not the most useful hold for a beginner.
The Stance
The correct stance works for bother left handed and right handed players.
- Your dominant leg should be forward with your knee slightly bent.
- Your knee should resting either on or just off the table.
- Your opposite leg should be back.
- Your weight should be equally balanced between your front and back leg.
- Stand on the balls of your feet so you can move quickly when you need to.
- Place your free hand on the edge of the rail.
The Defence
As a beginner, your first instinct may be to protect your goal by positioning the paddle right back by the goal. In theory that sounds like a plan.
But in practice, any shooter, with one good straight shot, would be able to sink the puck to the left or right of your paddle before you got the chance to block it.
To play like a pro, position the paddle a least 8 inches out from the center of the goal. Here’s why:
Straight shots
Straight shots come at your goal directly, they don’t touch the rail. With your paddle around 8 inches out from the center of the goal you’ll find you can move the paddle to the left or right, by just a few inches, in order to block virtually any straight shot.
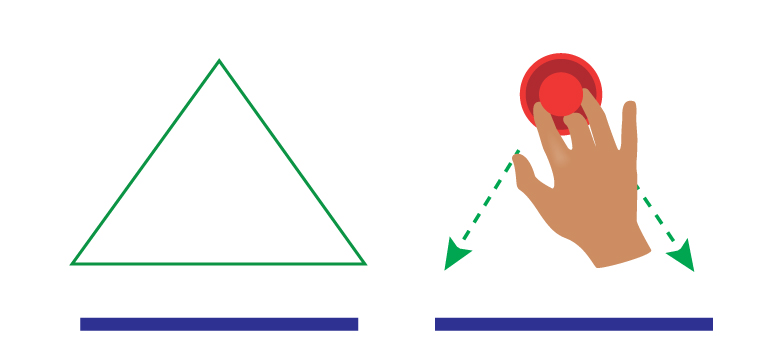
Bank Shots
Bank shots are shots that rebound off the rail. From the same out-defense position, you can block bank shots by pulling your mallet quickly back to the left or right side of the goal. This triangular-shaped pattern is called “the triangle defense” or the “pyramid defense”.
This defense strategy is used with great success by many of the top players. It’s also well known and widely adopted by amateurs.
But amateurs often make one big mistake with this defense, so here’s how not to make the same mistake:
The mistake people make is that they pull back too far so that they end up right back by the goal again. Keep your pyramid pattern away from the goal and you’ll be better placed to take a shot and your opponent won’t be able to sink the puck to the left or right of your paddle before you have the chance to block it.
Puck Control
One mistake beginners make is, that when they see the puck coming at them at speed they panic and hit it back instinctively without any intention behind the shot.
The great thing about air hockey, that people don’t realize, is that you get the chance to position the puck before taking a shot. Ideally, you want to have full control of the puck at all times so that you can set up your shots before exicuting them.
Another advantage of being able to keep control of the puck is that when your opponent keeps coming at you at a lightning speed, you’ll be able to take control and slow down the match to a speed that you are more comfortable dealing with. Just keep in mind that once the puck enters your side of the centerline you have 7 seconds to return it.
To establish control of the puck, what you want to do is catch the puck, (absorb it may be a better description) and then take it to a fixed location from where you can drift (see below) and shoot.
Tips:
- To maintain control, you can “drift” or hit the puck against the rail.
- When taking a shot keep in mind that if you take a shot and miss, you also want the puck to come straight back to you to take another shot, without your opponent ever getting possession of the puck.
Drifting
One technique used in air hockey is called drifting. It will help you:
- Maintain control of the puck.
- Allow you to take a shot from the most optimal angle.
- Confuse your opponent.
At the most basic level, you can have a go at this by tapping the puck with the mallet in one direction and then slice it back in the direction of the goal when you’re ready.
There are a few types of Drift you can practice:
- The Diamond Drift
- The Circle Drift
- The Reverse Diamond Drift
Watch World Campion Collin Cumming demonstrate how to perform the techniques below.
For further tips, you can watch Mark Robbins’s demonstration of the techniques we’ve covered in this guide, below.
So there you have it. Get familiar with the rules, if you don’t already know them and you’ll have the advantage over any beginner who doesn’t know these pro techniques. A little practice and you’ll soon be ready to try a few trick shots.
Front cover photo credit: Drew Coffman under CC License 2.0